Can You Repair Worn Out Leather Boot Heels Yourself?
Last Updated: November 4, 2026
Quick Summary
You can repair worn out leather boot heels yourself when the damage is limited to the heel cap or shallow surface scuffs, using sandpaper, leather filler, glue and a replacement cap. If the heel block is uneven, cracked or separating, or the heel counter has failed, a cobbler or replacement is the better choice.
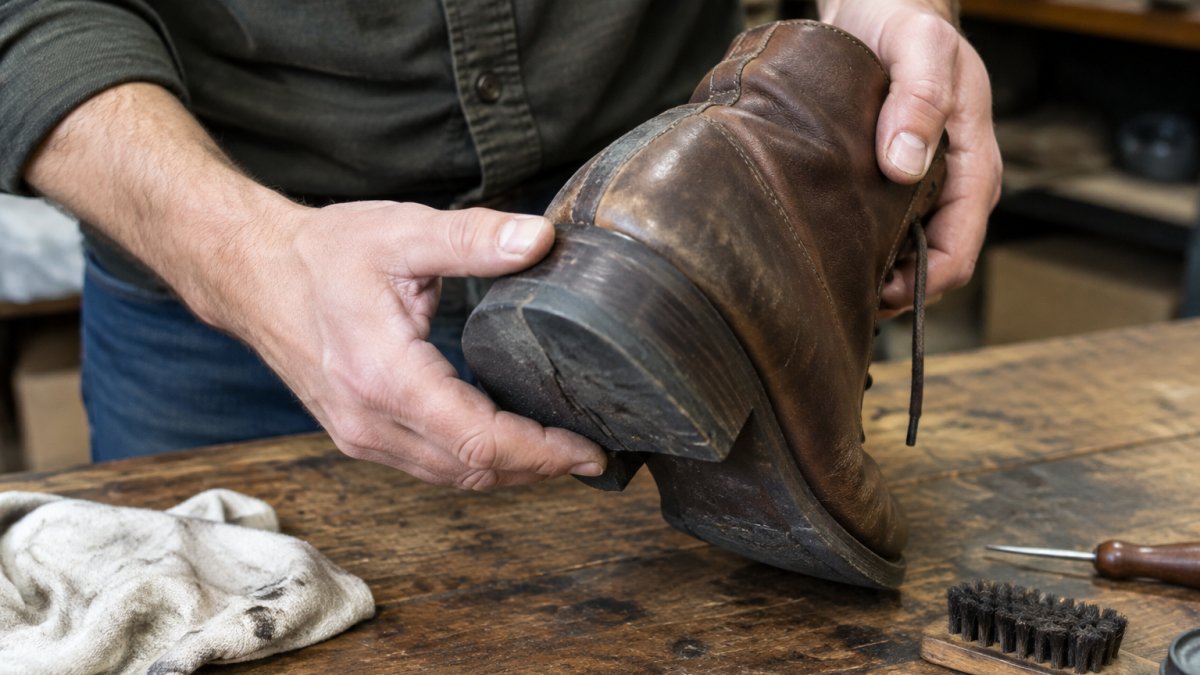
- Inspect the heel upside down: a slanted wear pattern on one side is normal and comes from how you walk.
- The heel cap is the sacrificial pad designed to wear out and be replaced, while the heel counter is structural leather.
- Apply leather filler in thin layers, since thick coats shrink as they cure and pull away from the edges.
- A properly bonded heel cap can last through a season of regular wear before it needs attention again.
- Check your heels every season, because a worn heel cap is easier to replace early than after the heel block is damaged.
Table of Contents
- Assessing Wear on Leather Boot Heels Before You Repair
- Repair or Replace? Deciding When Leather Boot Heels Are Beyond Saving
- What Goes in a Leather Boot Repair Kit
- Step-by-Step: Cleaning and Preparing Leather Boot Heels
- Using Leather Filler for Boots on Scuffs, Cracks, and Gouges
- Gluing, Recoloring, and Sealing Worn Heels
- Cobbler Heel Replacement Cost vs. DIY Time and Durability
- Preventing Uneven Heel Wear on Leather Boots
- Frequently Asked Questions
Assessing Wear on Leather Boot Heels Before You Repair
Repairing worn out leather boot heels starts with an honest inspection.
Turn the boot upside down and look at the back edge. A worn heel usually shows a slanted wear pattern on one side. That slant is normal.
Repair or Replace? Deciding When Leather Boot Heels Are Beyond Saving
Many heel problems are repairable. The decision hinges on which part of the heel is worn and how the heel is built, not on how old the boots are. Use the heel anatomy below to sort damage into three buckets: routine DIY, cobbler service, and replacement.
Read the heel by construction
A boot heel is not one piece. It is a stack of components, and each fails differently:
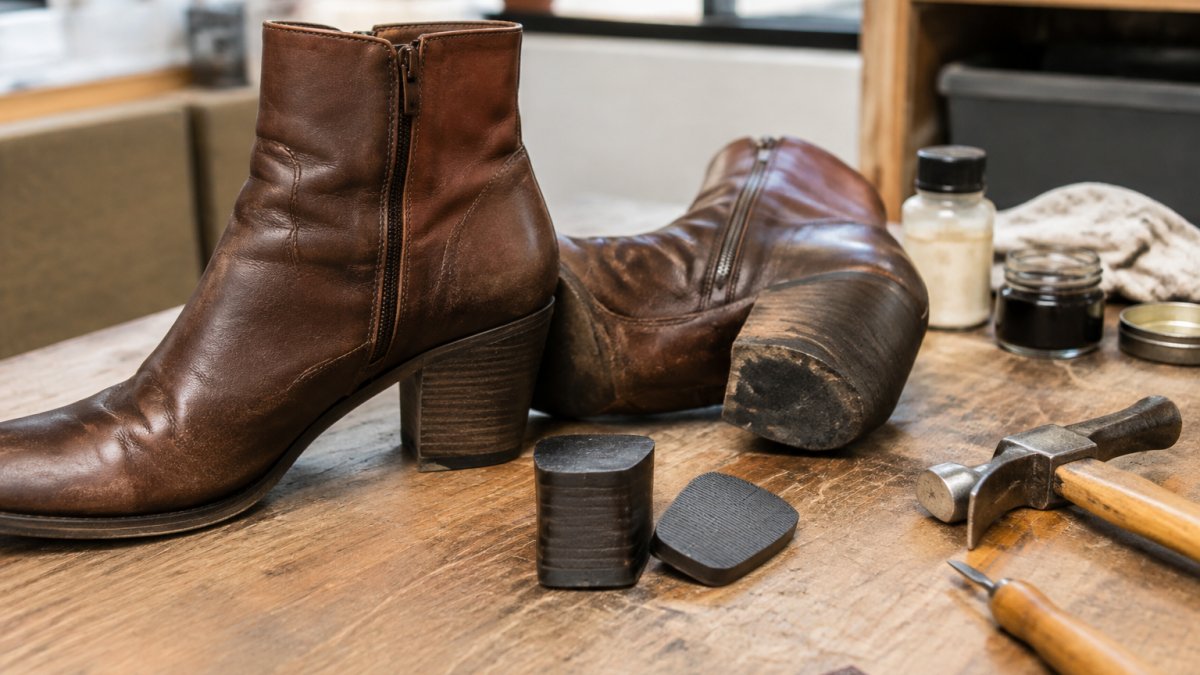
- Heel cap (top lift): the thin rubber or plastic pad at the very bottom that contacts the ground. This is the sacrificial part. It is designed to wear out and be replaced.
- Heel block (heel stack): the layered body of the heel, which may be stacked leather, rubber, wood, or a combination. Stacked leather heels are common on dress and western boots; rubber and combination heels are common on work boots.
- Heel breast: the front face of the heel block that meets the arch. Wear here usually signals a gait or fit issue.
Repair-versus-replace criteria
Work down this list in order. Stop at the first condition that applies.
Repair with DIY supplies when:
- The heel cap is worn thin or missing but the heel block underneath is intact and level.
- Wear is confined to the cap and the surrounding leather is sound.
- Scuffs or surface cracks on the heel breast are shallow and the leather is not lifting.
Send to a cobbler when:
- The heel cap is worn through and the heel block has begun to wear unevenly.
- One heel is noticeably shorter than the other, which throws off your stance.
- The heel block is cracked, chipped, or separating from the sole.
Replace the boots when:
- The heel counter has cracked through, collapsed, or separated from the insole.
- Leather around the heel has torn away from the insole or the heel seat.
- The sole is separating in more than one place and the upper leather is also failing.
Watch out: gluing a cracked heel counter hides the problem for a week, then fails worse. The crack spreads under the glue and takes the surrounding leather with it.
Heel type changes the answer
- Stacked leather heels (common on dress and western boots) can be rebuilt layer by layer by a cobbler, but DIY filler will not restore a worn stack. Replace the cap early to protect the stack.
- Rubber and combination heels (common on work boots) usually take a screw-on or cemented cap that a DIYer can replace with basic tools.
- Cuban, block, and tapered heels change the contact patch and wear pattern; a cobbler should match the original profile so the boot sits level.
If your boots are past saving, we would rather you replace them with something built to last. Our full grain leather boots are made for exactly this kind of long-term wear, and the leather Chelsea boots suit anyone who wants a cleaner profile for the office.


What Goes in a Leather Boot Repair Kit
A basic leather boot repair kit covers most heel jobs. You do not need a workshop. You need the right few items.
A practical kit includes:
- Leather cleaner and a soft cloth
- 150-grit sandpaper and a finer 400-grit sheet
- Leather filler for boots, in a polymer paste form
Step-by-Step: Cleaning and Preparing Leather Boot Heels
Clean leather is the difference between a repair that holds and one that peels. Follow these steps in order.
- Brush off loose dirt with a dry cloth.
- Apply leather cleaner to a cloth, not directly to the boot.
- Work it into the heel in small circles.
- Wipe away residue and let the leather dry fully.
- Tape off the areas you do not want to touch.
Do not soak the leather. Damp is enough. Wet leather stretches and loses shape, and a heel that has stretched will not sit flat again.
Sanding and Smoothing the Repair Area
Sanding sounds aggressive. It is not. You are roughening the surface so the filler and glue have something to grip.
- Use 150-grit sandpaper on scuffs and raised edges.
- Sand with the grain, not across it.
- Feather the edges so the repair blends into the surrounding leather.
Light pressure, short strokes. If you sand down to the suede layer underneath, you have gone too far.
Using Leather Filler for Boots on Scuffs, Cracks, and Gouges
Leather filler is a flexible compound that fills damaged areas and cures to a sandable, paintable surface. Apply it in thin layers, not one thick blob.
Leather Penny Loafers With Low Stacked Heels →
- Scoop a small amount onto an applicator.
- Press it into the crack or gouge, working from the edges inward.
- Smooth the top with the applicator edge.
Deep scratches may need three thin coats. Thick coats shrink as they cure and pull away from the edges. That is the most common DIY failure we hear about.
For heel-block wear specifically, filler is the wrong product. That area needs a new heel cap or a cobbler's replacement, not paste.
Gluing, Recoloring, and Sealing Worn Heels
Glue comes before color. Recoloring a loose heel cap just hides a repair that is about to fail.
- Apply leather glue to both surfaces.
- Press together and hold for the time on the label.
- Wipe away squeeze-out immediately with a damp cloth.
Color Matching and Conditioning
Match the balm in daylight, not under indoor bulbs. Take the boot to a window and compare the balm to the heel, not the toe. Heels fade faster than the rest of the boot.
Apply the balm in thin coats with a cloth. Build the color slowly. Then condition the whole boot with mink oil or a quality leather conditioner to restore water resistance and keep the leather supple.
Cobbler Heel Replacement Cost vs. DIY Time and Durability
A cobbler can replace a heel block and match the height. DIY fixes surface damage only. Neither is wrong. They solve different problems, and the right choice depends on which heel component is worn.
What each option actually covers
- DIY heel-cap replacement: you remove the worn cap, clean the heel block, glue on a new cap, and trim it flush. This restores the sacrificial wear layer only.
- DIY surface repair: filler and dye address scuffs, shallow cracks, and cosmetic damage on the heel breast and counter. This does not restore structure.
- Cobbler heel-cap replacement: the cobbler removes the old cap, levels the heel block, and bonds a new cap matched to the original thickness and profile.
Time and durability expectations
| Factor | DIY heel cap | DIY surface repair | Cobbler cap replacement | Cobbler heel rebuild |
|---|---|---|---|---|
| Typical turnaround | Under an hour plus adhesive cure | A few hours plus cure | A few days | About a week |
| Skill needed | Low to moderate | Low to moderate | None | None |
| Durability | Good until the cap wears through again | Cosmetic only; does not restore structure | Full cap lifespan | Full heel lifespan |
| Main risk | Uneven trim, weak bond | Color mismatch, filler pulling away | Cost of service | Cost of service |
A properly bonded heel cap can last through a season of regular wear before it needs attention again. DIY surface repairs are cosmetic and should be judged on appearance, not lifespan.
Cost logic without guesswork
Cobbler pricing varies, so ask for a quote before you commit. The decision rule is simpler than the price list:
- If the heel cap is the only worn part, DIY replacement is the lowest-cost path and the skill barrier is low.
- If the heel block is worn unevenly or the boots are stacked-leather, western, or dress, the cobbler rebuild is the better value because a DIY patch will not restore the profile.
- If the sole is separating at the heel seat, do not DIY it, that is a structural repair.
A common mistake is paying a cobbler to fix a scuff you could have handled in twenty minutes. The reverse mistake costs more: patching a heel block that needed replacing, then paying twice.
When to stop repairing
If a cobbler quotes a heel rebuild that approaches the cost of a comparable new pair, and the upper leather is also thinning, replacement is the rational choice.
If you are weighing repair against a new pair, our piece on why premium leather goods cost more explains where the money actually goes. And if hard wear is the issue, the Guardian safety boot is built for that kind of use.

Preventing Uneven Heel Wear on Leather Boots
Uneven heel wear is a walking pattern, not a leather defect. You can slow it down.
- Rotate pairs so each boot gets rest days.
- Use shoe trees to hold the heel counter shape.
- Replace heel caps as soon as they thin.
Check your heels every season, since a worn heel cap is easier to replace early than after the heel block is damaged.
Frequently Asked Questions
How can I repair worn heels on my boots?
Start by identifying the damage: a worn heel cap or block is a DIY job, while a cracked heel counter needs a cobbler. Clean the area with a leather cleaner, sand lightly with 150-grit sandpaper, fill gouges with leather filler, then recolor with a matching balm and seal with a protective coating. If the heel block itself is worn through, a professional replacement is the safer route.
How much does a cobbler charge to replace boot heels?
Cobbler heel replacement cost varies by construction and material, so ask for a quote before committing. As a rule, a heel replacement is a fraction of the price of a new pair of quality leather boots, which is why repair usually wins for well-made footwear. Compare the quote against the boot's original price and remaining sole life before deciding.
Can I use leather filler to fix deep gouges in boot heels?
Yes, leather filler for boots works well on scuffs, cracks, and gouges in the leather surface, including the heel counter. Clean and sand the area first, apply the filler in thin layers, and let each layer cure before sanding smooth. Filler restores the surface, not the structure, so if the heel block is crushed or the leather is torn through, have a cobbler assess it.
What tools are required for a DIY leather boot heel repair?
A basic leather boot repair kit should include a leather cleaner, 150-grit sandpaper, leather filler or repair compound, leather glue, masking tape, an applicator, a cloth, and a matching recoloring balm. Add a leather conditioner such as mink oil and a protective coating to finish. A hair dryer helps speed curing between layers.
Leather boots reward the owner who pays attention. A little cleaning, a thin layer of filler, and a fresh heel cap keep a good pair in rotation for years. When a pair is genuinely finished, Vinthentic makes the replacement simple, with genuine leather craftsmanship and timeless designs built for everyday comfort. Browse our collection and step into a pair made to be worn, repaired, and worn again. Get started with Vinthentic and find footwear that earns its place in your wardrobe.

Read more

How to Repair and Maintain Business Suits at Home
Business suits last longer with the right care. Learn how to brush, steam, store and make minor repairs to keep your suit looking sharp for years.
Read more
Cleaning and Restoring Vintage Silk: A Step-by-Step Guide
Learn how to clean and restore vintage silk without damaging delicate fibers. Follow safe washing, stain removal, and storage steps to protect your pieces.
Read more